Showing posts with label DIY. Show all posts

Tuesday, May 8, 2012

tea-riffic mother's day DIY

With Mother's Day just around the corner, I decided to make tokens for some friends and Bud's teachers. Nothing elaborate. Just a simple yet thoughtful teacup card to let them know they are appreciated. Isn't that what really matters? 

If you want to try making some for your friends or co-workers, here's what you'll need:
1. sheets of printed card stock or scrap booking paper 2. tea-cup template 3. pencil 4. glue 5. cutter 6. string 7. scissors
Step#1 Fold your paper in half. Using the template, draw the teacup at the top of the paper with the cup handle touching the fold.  If you are using a 12in x 12in sheet of paper, you can make 3 teacups with one sheet.

Step #2 With a cutter, cut out the teacups. Glue the sides and leave the top open so you have a pocket for the tea bags.

Step #3 Using your extra paper, cut out small pieces for your gift tag. Tie the tag around your teacup handle with a string.
Happy DIY-ing, Bunnies!

Monday, September 5, 2011

plastic jars


I'm a self-confessed pack rat when it comes to empty jars and containers. Instead of throwing them in the recycling bin, my first instinct is to wash them and keep them in the cupboard just in case. The Mister would ask "just in case of what?"

Well, the plastic jars come in handy for organizing the little one's mess toys - blocks, magnets, puzzle pieces, crayons and whatnots.

Have a great week ahead, bunnies!

Saturday, September 3, 2011

welcome snack box


My mother-in-law is coming to visit and I thought this would be the perfect way to welcome her - with a snack box filled with all her favorites.

Friday, August 5, 2011

have a crafty weekend

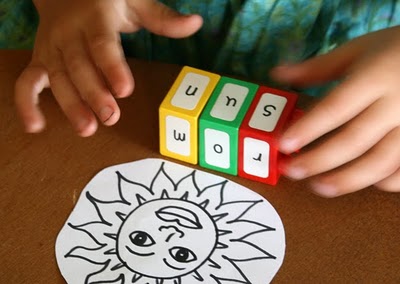
I love this idea of repurposing duplo blocks into letter blocks! I think for now what I'll do is to label the blocks by its color to help the little guy learn how to read. He can definitely identify the colors but it would be a good exercise to associate the word with the color.


all photos from filthwizardry

Saturday, April 23, 2011

edible table setting


This makes me want to host a playdate.


Have a playful weekend, bunnies!

Thursday, April 21, 2011

festive weekend


I'm looking forward to celebring Easter Sunday with our MN foster family. We're having a potluck and I volunteered to decorate the venue with these easy-to-do colorful streamers.

I'm also thinking about making these tissue pompoms. Aren't they the cutest?

Now I have to get back to filling up the plastic eggs with candies.

How are you celebrating Easter?

Tuesday, April 12, 2011

a bud's life: cardboard truck

This morning was spent driving around in a makeshift fire truck.


Systems check.


Vroom, vroom!


ree-ruu-ree-ruu...


This is fun! Want to drive, mom?


Tuesday, March 8, 2011

home improvement: picture wall

We finally finished our picture wall project for our dining area! Up on the wall is a collection of photographs taken during our travels. We had our photos printed at Costco and mounted them on Ribba frames from Ikea.


I know the photos don't do justice to the collection but I was just too excited to share them with you.

Before you start your DIY picture wall, here are some tips I would like to share from our experience.
#1 Have an visual reference for the layout before you buy your frames and print your photos.
#2 Make paper mock ups of your frames that you can tape on the wall so you can easily measure and adjust to your desired layout.
#3 Start at the center of your wall so you can keep adding more frames on each side.
#4 You can drill through the paper mock ups to get a more accurate measure of where the hooks should be.

Happy nesting, bunnies!

Saturday, February 26, 2011

paper leaves

I am already counting the days to spring. If only weather.com could tell me exactly when it will come. I am done with winter and the bitter cold. Seriously, it's been four months since I last saw green!

she had us at hello

Hanging paper leaves is a clever idea to cheer up a room on an overcast winter's day . Another project to look forward to this week.

Keep warm, bunnies!

Saturday, February 19, 2011

crafty playtime

Looking for fun and inexpensive family activities you can do this weekend? Here's an idea!


Have a crafty weekend!

Friday, February 18, 2011

positive discipline and clever diversions

If you have been living with a little person for a while you probably figured out by now that they are natural copycats. They try to imitate everything they see us do. Lately Bud has been showing a lot of interest in keys and opening doors. He would rummage around my purse to look for keys, bring it to the door and try to put it in the keyhole. Of course he can tell the play keys from the real keys - just like with everything else. Even if we buy them plastic laptops they still insist on tinkering with our real laptops. Sigh!

As much as possible I try to practice positive discipline. I try to avoid using the word "NO" as much as I can and reserve it only for times when I want to stress a point. I'm afraid that saying it too much would make Bud NO-deaf, as some experts so aptly coined it. Instead, I tell him what he CAN do.

This morning as P was about to leave for work, Bud was clinging on to him insisting on playing with the door knob again. He was holding the house key and wanted to put it in the keyhole. I had to look for diversion, quick! Good thing we haven't thrown out the box of our newly purchased file cabinet. I pierced a hole on the image of the lock and showed Bud that he can instert the key there. Bud was super happy with his new cardboard file cabinet. Instant new toy. Success!


Friday, August 6, 2010

DIY inspirations

I've been very busy ... reading blogs and getting ideas for craft activities Bud and I could do together, haha!

Last week was paper plate art week. We made a fish bowl (with cutout fish, of course), an elephant and a lion. They were very crude (so I didn't bother to take photos) but Bud enjoyed playing with them nonetheless. And mind you, he could identify the animals even if they were not professionally done.

This morning I stumbled across this blog where I got my inspiration to make home-made finger paints for Buddy. The recipe I used was:

2 cups white flour
2 cups cold water
food coloring

Put water into a large bowl. Slowly add the flour, while the children are stirring. Once it's all mixed together, divide into smaller bowls and add food coloring.

The finger paint idea was amazing! It was so fun yet very easy to do. I wasn't able to take photos with my hands all messy from the paint mixture. Will try to take some shots when we do our painting session again tomorrow.

It was funny how Bud was more curious with the new sensation and texture in his hands. He was dipping his hands in the paint then he would open and close them. Maybe tomorrow he will be more comfortable with the idea of painting with his fingers.

Finger Paints from Homemade Mamas

Here are more great ideas that we will be trying out very soon....

Oatmeal Playdough from The Life of Jennifer Dawn


Felt Car Mat from Serving Pink Lemonade

I can't believe the week is almost over! How fast time flies when you're with people you love.

LinkWithin

Related Posts Plugin for WordPress, Blogger...